Many more modern laptops from the Macbook series have entered our lives since the first Apple laptop with an SSD (solid-state drive) got launched in 2008. SSD has faster read/write speeds than HDD (hard disk drive), but in terms of data recovery, it is more difficult to recover files from SSD than from HDD.
These are some of the most typical signs that your SSD is having issues, such as the SSD on your MacBook Pro not mounting or the SSD not being recognized by your MacBook Pro in Disk Utility. After you carelessly deleted some important documents and then realized that you did not have a backup on hand, you might want to find a way to get them back. This article about how to recover data from MacBook SSD will solve your quandaries.
Table of Contents
What is the Chance Rate of Recovering Data from Macbook SSD?
You can use the Command + Z hotkey combination to immediately recover your Mac files if you’ve just deleted them and haven’t yet manually cleaned up the Trash folder. Data recovery will take longer if you have permanently deleted files from your Mac SSD or cleared the Trash folder.
(1). What happens to the SSD when you delete a file from the computer?
The file is made inaccessible and invisible to the naked eye when you move it to the trash folder on your Mac and empty the trash, but it is not immediately deleted. Instead, the computer permits later overwriting of the space it occupied. However, it will take more work to restore permanently erased information on a MacBook with the TRIM mechanism active.
(2). How can I determine whether a Mac SSD is in TRIM mode
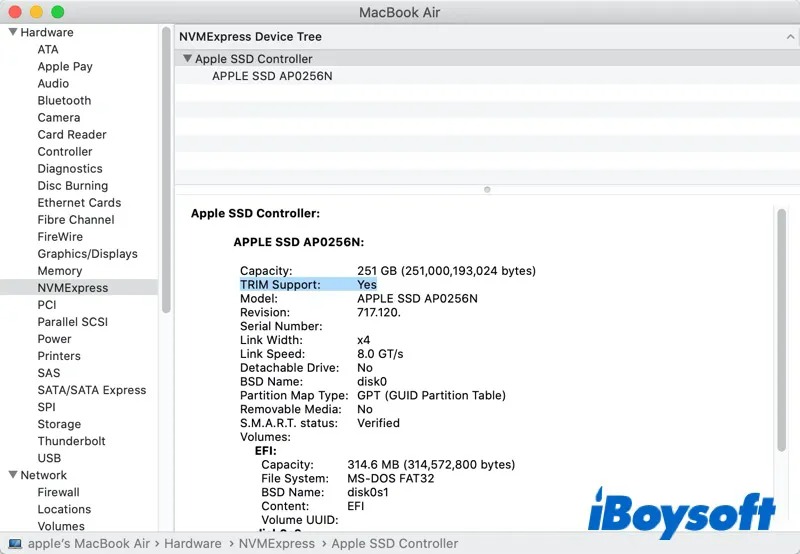
A short time after solid-state drives were first introduced, the TRIM command, also known as an Advanced Technology Attachment (ATA) command, got released. An SSD’s lifespan can be increased by reducing unneeded writing to it with the trim feature. You may verify whether TRIM is turned on for your Mac’s SSD like this.
- Click on the Apple icon on your computer screen -> select “About This Mac” -> and then choose “System Report”.
- On the System Information panel, go to “Hardware” and then find NVM Express or SATA/SATA Express.
- If “Yes” appears next to “TRIM Support”, the TRIM command is already active on your Mac (refer to the example image below).

(3). When TRIM is enabled on my Macbook, can I recover data from the SSD?
When users permanently delete files from SSDs with TRIM deactivated, the SSD continues to hold the deleted data on its sectors because the disk sectors have not received the TRIM command, which allows the SSD to prioritize blocks for cleaning. In this case, recovering the deleted files will be simpler for Mac users.
The TRIM feature is, however, activated by default on the latest generation of SSDs. The TRIM-enabled SSD will instantly clean all sectors when you remove any file from it. As a result, data recovery becomes substantially more challenging.
I. When Do You Have to Recover Data from MacBook SSD
Some users may not be aware that the hardware is at risk of data loss since malfunctioning SSDs on Mac laptops might work silently. When you find yourself in the conditions listed below, you should try to salvage your files from the MacBook SSD as soon as you can.
- You permanently deleted some important files on Mac
The following four common scenarios should be familiar to you: permanently deleting files with the keyboard shortcut Option + Command + Delete; right-clicking anywhere in the Trash folder and choosing Empty Trash; deleting files that have been in the trash for more than 30 days, and selecting Delete Immediately in Finder.
- Human reasons caused errors on the SSD
Data security is hampered by careless human errors. Examples include the unintentional destruction of an APFS partition or container, formatting the disk incorrectly, file system corruption, liquid damage, overheating, and more.
- After malware and viruses attacked your SSD
Ransomware could be a factor in up to approximately 10% of data breaches the last year. When the MacBook screen starts flickering and Mac cannot mount but remains on the loading screen, you should remain cool, check to see whether your machine is secure, and then execute data recovery if necessary
II. Two Methods and Detailed Steps for You to Recover Data from MacBook SSD
Stop using the impacted SSD as soon as a data loss incident occurs on the computer, according to best practices. This will lessen the possibility that Mac will replace the lost or destroyed files. Then, you should try some workable approaches to recover your files as quickly as possible.
Method 1. Make Use of the Professional Data Recovery (Mac)
iBoysoft Data Recovery for Mac fully supports recovering files from SSDs, HDDs, external hard drives, SD cards, USB flash drives, and many other disk-based storage media devices. This user-friendly Mac data recovery tool will help you if you experience data loss issues as a result of incorrect formatting, a virus assault on your system, or the unintentional deletion of a folder, or file.
The software instruction that follows will show you how to recover deleted or lost files from a MacBook SSD.
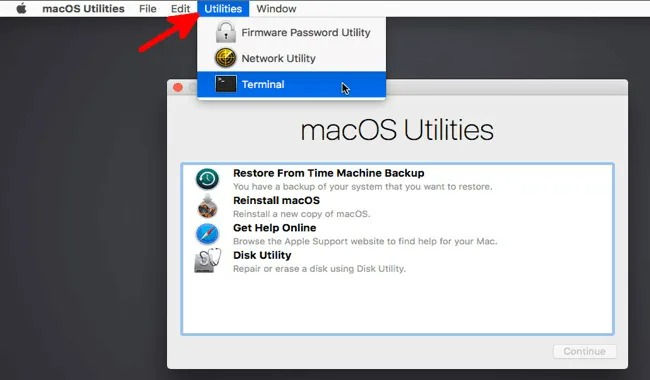
Step 1: Make sure your computer is connected to the Internet, restart it in macOS Recovery mode, and then select “Utilities” to launch Terminal (check out this image).

Step 2. Enter the following command to immediately start the macOS Recovery mode of iBoysoft Data Recovery for Mac.
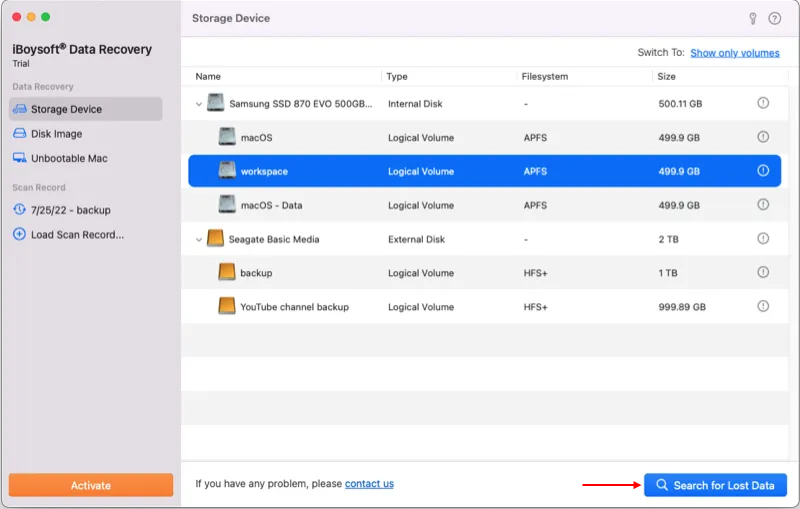
sh <(curl http://boot.iboysoft.com/boot.sh)Step 3. Select your MacBook SSD on the main interface of iBoysoft software after it runs, then click “Search for Lost Data.”

Step 4. You can view a preview of the scanning findings after the data scanning process is complete. As an alternative, you may use the search box or filters to hone in on certain results.
Step 5: Select the files you require, then click the “Recover” button to restore the recoverable file to a safe location, for example, an external USB drive.
Method 2. Use Mac’s Time Machine feature to restore files
If the app is activated prior to the data loss occurrence, you can restore your files from Time Machine backup files.
- Connect your MacBook Pro/MacBook Air to the Time Machine backup drive (an external hard drive) -> click the Time Machine icon in the menu bar.
One small tip: if you can’t see the icon of Time Machine in this step, you can manually add Time Machine from System Preference: click on the Apple icon -> go to “System Preference” -> Time Machine -> check the box next to “Show Time Machine”. - Find the specific file from the timelines and backup files, select all the files you need, and then press Space Bar to preview the content. At last, click “Restore” to put the files back where they were before.
Thanks for visiting mahagamer.com